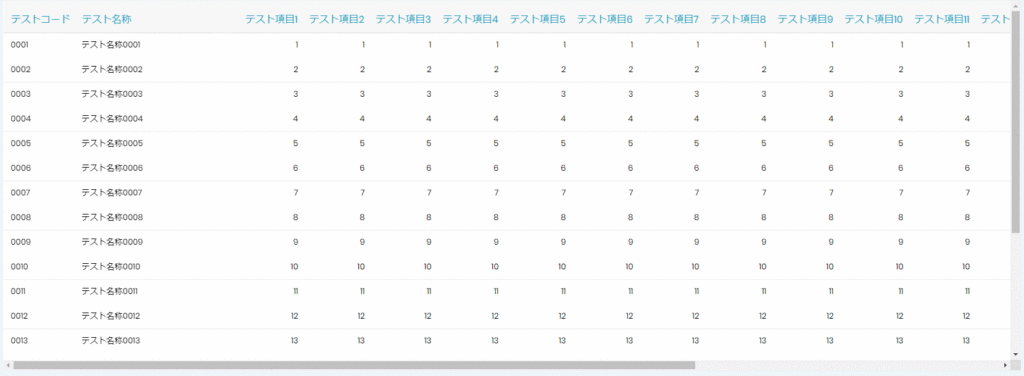
項目数の多い一覧で、ヘッダや主要項目を固定する際の手順を記載します。
1.カスタムテーマの作成
Sticky用のカスタムテーマを作成します。
今回はヘッダと左の項目2つを固定とするカスタムテーマを用意しました。
サイズ・カラー等は作成する画面によって適時変更してください。
Classes>Section
①Sticky_Section
Custom Properties:「overflow-x: scroll;」
②Sticky_Section1
Custom Properties:「position: sticky;left: 項目1開始px;background-color: #ffffff;z-index: 4;」
②Sticky_Section2
Custom Properties:「position: sticky;left: 項目2開始px;background-color: #ffffff;z-index: 4;」
④Sticky_SectionTitle1
Custom Properties:「position: sticky;left: 項目1開始px;background-color: #ffffff;z-index: 6 !important;」
⑤Sticky_SectionTitle2
Custom Properties:「position: sticky;left: 項目2開始px;background-color: #ffffff;z-index: 6 !important;」
Custom
⑥Sticky_Grid>thead>tr>th
Custom Properties:「position: sticky;top: 0px;background-color: #f7f7f7;z-index: 5;」
2.Patterns
一覧画面のGridをSection内に配置します。
Sectionプロパティ
Thema class:1.で用意した「Sticky_Section」
Section Width/Height:一覧の大きさに合わせて自由に設定します。
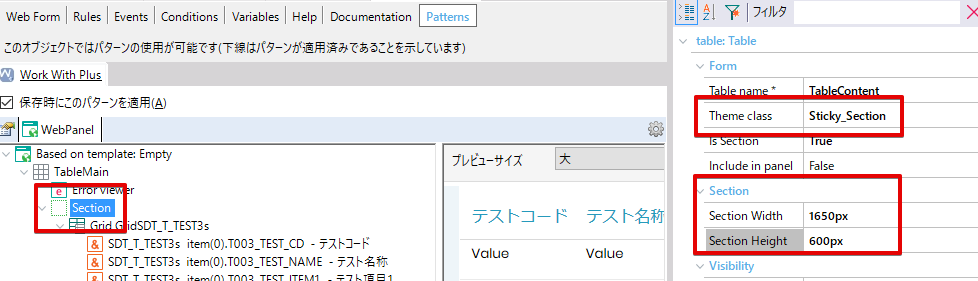
スクロールに関する設定をします。
Gridプロパティ
Include Pagination:False
Paging Type:One page at a time
Page:unlimited

3.Refreshイベント
データ固定部のクラスに1.で作成したテーマ②③を当てます。
元々指定されていたクラスがあれば一緒に指定します。
|
1 2 |
SDT_T_TEST3s__T003_TEST_CD.ColumnClass = !"gx-tab-padding-fix-0 gx-attribute Sticky_Section1" SDT_T_TEST3s__T003_TEST_NAME.ColumnClass = !"gx-tab-padding-fix-0 gx-attribute Sticky_Section2" |
4.Grid.Loadイベント
Gridのクラスに1.で作成したテーマ①を当てます。
ヘッダ固定部のクラスに1.で作成したテーマ④⑤を当てます。
|
1 2 3 4 |
GridSDT_T_TEST3s.Class = "GridNoBorder Sticky_Grid WorkWith" SDT_T_TEST3s__T003_TEST_CD.ColumnHeaderClass = !"Sticky_SectionTitle1" SDT_T_TEST3s__T003_TEST_NAME.ColumnHeaderClass = !"Sticky_SectionTitle2" |
5.実行結果