 2020.03.02
こんにちは、kiyokawaです。
一覧画面 -> 詳細画面 のようなよくある画面を開発するとき、RecyclerViewを利用しますよね。
しかし、RecyclerViewで異なるレイアウトを表示したい時、ViewTypeを利用してこのViewTypeならあのViewをinflateして…と色々実装する必要があって面倒ですね。
Groupieを使うと楽に実装できます。
はじめに
一つのRecyclerView内に複数の見た目のViewを表示する場合、ViewTypeを利用して対応するViewHolderを作って返却させて、Viewにセットするデータを変えてとやる必要がありAdapterが膨れたりボイラープレートが出てきたりで大変です。
Groupieを使うと、Adapter.update()にItemのリストを渡すだけで更新してくれます。
さらにDiffUtilを使って追加時や変更時に自動的にアニメーションもかけてくれます。
GitHub: https://github.com/lisawray/groupie
導入
build.gradleに記載する
|
1 2 3 |
implementation "com.xwray:groupie:2.7.1" // DataBindingを使うならこれも implementation "com.xwray:groupie-databinding:2.7.1" |
RecyclerViewの用意
まずRecyclerViewを持つレイアウトを用意します
|
1 2 3 4 5 6 7 8 9 10 11 12 13 14 15 16 17 18 19 |
<layout xmlns:android="http://schemas.android.com/apk/res/android" xmlns:app="http://schemas.android.com/apk/res-auto"> <androidx.constraintlayout.widget.ConstraintLayout android:layout_width="match_parent" android:layout_height="match_parent"> <androidx.recyclerview.widget.RecyclerView android:id="@+id/recyclerView" android:layout_width="0dp" android:layout_height="0dp" app:layoutManager="androidx.recyclerview.widget.LinearLayoutManager" app:layout_constraintBottom_toBottomOf="parent" app:layout_constraintEnd_toEndOf="parent" app:layout_constraintStart_toStartOf="parent" app:layout_constraintTop_toTopOf="parent" /> </androidx.constraintlayout.widget.ConstraintLayout> </layout> |
レイアウトを用意したらRecyclerViewにGroupAdapterをセットします
|
1 2 3 4 5 6 |
val binding = DataBindingUtil.setContentView( this, R.layout.activity_sample ) val adapter = GroupAdapter<GroupieViewHolder<*>>() binding.recyclerView.adapter = adapter |
Itemを作成する
RecyclerViewに表示したいItemを作成します
今回はDataBindingを利用しているのでBindableItemを継承します
|
1 2 3 4 5 6 7 8 9 10 11 12 13 14 15 16 17 18 19 20 21 |
class HeaderItem( private val headerText: String ) : BindableItem(headerText.hashCode().toLong()) { override fun getLayout(): Int = R.layout.header_item override fun bind(viewBinding: HeaderItemBinding, position: Int) { viewBinding.textHeader.text = headerText } } class BodyItem( private val bodyText: String ) : BindableItem(bodyText.hashCode().toLong()) { override fun getLayout(): Int = R.layout.body_item override fun bind(viewBinding: BodyItemBinding, position: Int) { viewBinding.textBody.text = bodyText } } |
表示させる
作成したItemのリストを作り、Adapterのupdateに渡します
Kotlinの operator fun plusAssign がMutableCollectionの拡張関数として定義されているので見やすくかけていいですね
|
1 2 3 4 5 6 7 8 9 10 11 12 13 |
val items = mutableListOf() items += HeaderItem("果物") items += BodyItem("りんご") items += BodyItem("みかん") items += BodyItem("ぶどう") items += HeaderItem("スポーツ") items += BodyItem("野球") items += BodyItem("サッカー") items += BodyItem("バスケ") items += BodyItem("ラグビー") adapter.update(items) |
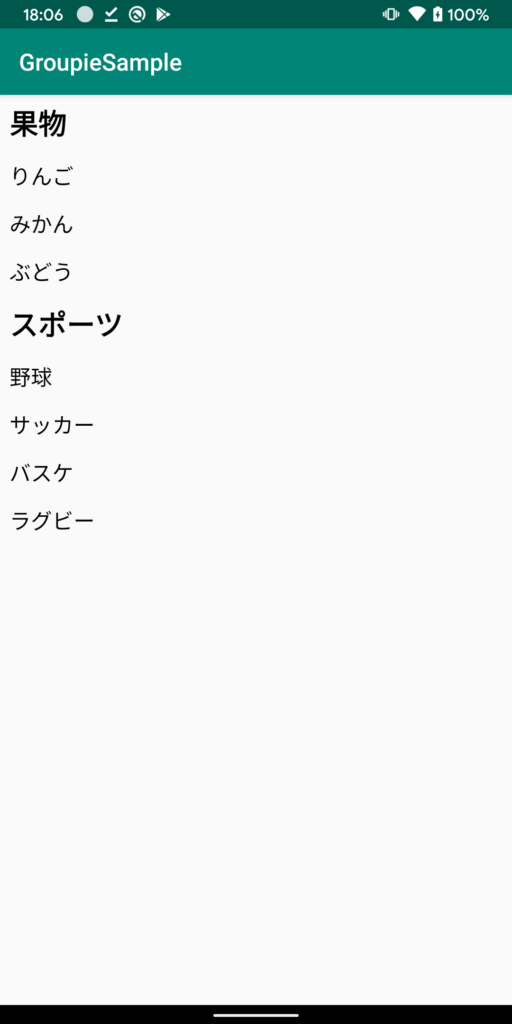
上記の記述だけでHeaderとBodyの2パターンを表示するRecyclerViewを簡単に構築できました!
おわりに
Groupieというライブラリを知ったのは去年のちょうど今頃で、DroidKaigiアプリの中から見つけたものでした。
オープンソースのプロジェクトのbuild.gradleを少し眺めてみるだけでも、自分の知らない便利なライブラリを知ることができます。
日々の開発をより快適にするために、GitHubに公開されているプロジェクトを眺めることを習慣化していきたいですね。